
Contact lists are great for targeting promotions at clients who have previously purchased a particular product or from a range of products. From a Contact List you have the option to email, text, phone or ‘pigeon post’ them.
From Main Menu:
- 4 [Contact/Clients]
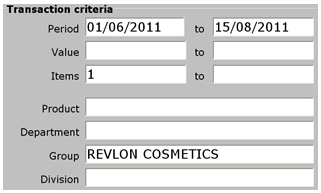
F7 [Maintain Contact/Clients in Bulk], F3 Add if needed. - Set a Period range (recalling customers who have made a purchase within this time frame)
- Set either a Value or Item count in the first Value or Item box (ie they must have purchased at least X number of items or spent at least Y in monetary value during that period)
- Choose an appropriate Collection Type (ie pick a Dept, Group that incorporates the range of products you want the customer to have purchased from)
- Alternatively (or in addition to) you can use any of the other available options: For example use Product (for purchasers of one particular item), Product Desc (for a particular range of products with a similar naming criteria) or On Pricelist (for all current products from a particular supplier
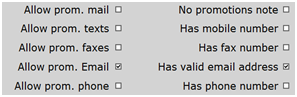
- In the interests of Privacy (and assuming that you have been updating the fields and No Promo flags in the Client record) tick the appropriate Promotional media boxes that you plan to use to target your customers. (It’s a good idea to target one media type at a time)
- F11 [Next page]. Tick the “Output” options you require.
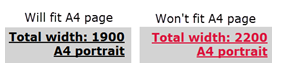
NB: if you plan to print the generated list check the Total width indicator, an A4 portrait should be no more than 1980. Check F1 for more help
- F11 [Next Page], F12 [Accept Details]
Sorting/Adding/Removing Clients in the list
- Your initial list will now be generated, and you can do several things to it:
- Add another group of clients [F2 Edit, A Add in Bulk, enter the new criteria, F12 Accept]
- Sort it by name, value or items [F3 Sort].
NB: During the final process you have the option to select a particular number of clients so sorting now is a good choice. - Remove a range of customers [F2 Edit, R Remove in Bulk, enter the criteria for customers to be ‘dropped’ from the list, F12 Accept]
- Remove individual customers [F2 Edit, E Edit list, highlight the client to be removed from the list, F10 Del, F12 Accept]
Once your final list is created you can now:
-
Print (list to hard copy): F7 [Print], select number of customers, F12 [Accept]
NB: Lists and labels will print on the assumption that you have the required Report & Mail Label printer set up and configured correctly for this workstation under Devices Setup. -
Export (for manipulation or mail merging): F7 [Print], select number of customers, F5 [CSV] or F7 [File]
NB: CSV files are saved by default to C:\Toniq Users\Exports\Export.csv whilst Text files are saved by default to C:\Toniq Users\Reports\Report.txt -
Labels (for posting): F8 [Labels], select appropriate options, F12 [Accept]
NB: Lists and labels will print on the assumption that you have the required Report & Mail Label printer set up and configured correctly for this workstation under Devices. -
Email or Text: F9 [Contact Clients], (if you want to use this list again give it a Contact list Name now), F7 [Create Msg], create message & F12 [Accept], F9 [Send Msg], choose appropriate media and options.
Comments
0 comments
Article is closed for comments.